Showing posts with label Birthday. Show all posts

Monday, July 20, 2009

Big Bold Birthday

Hi everyone,

I just thought I'd pop in quickly to post one of the cards I made recently. I've taken the colour scheme from a card made by Julie Davidson and I've used the Big Bold Birthday stamp set for the image. I hope you like this little (and quick) creation.

Soon school holidays will be over and I'll have my new computer to replace my current one (which is very temperamental and dodgy) which will allow me to post more consistently. So keep tuned, I will return with more creations when I can.

Supplies:
* Big Bold Birthday Stamp Set.
* Taken with Teal, So Saffron, Whisper White & Gable Green Cardstock.
* Taken with Teal & So Saffron Stamp Pads.
* Scallop Edge Punch.

Monday, March 2, 2009

Make a Wish

Wow, what a busy week I've had. First on Thursday the family and I went to Darwin for a few days. When we returned home, I had to prepare for Master Seven's "boys only" birthday party followed by a BBQ dinner with a few friends. Then, on Sunday I demonstrated Stampin' Up! to a wonderful group of ladies (Hello Ladies {waving}) who all enjoy stamping as much as I do.

Today's card is one of the cards we made during the demonstration and incorporates Stampin' Ups Tearing Edge. I love this layout because of it's simplicity and it's a great starting point for beginner stampers. Also, it can be reproduced so many times in different colours, images etc that each card you make using this layout will look completely different. I hope you like today's card.

Supplies:
* In the Spotlight & So Many Sayings Hostess Sets (retiring).
* Night of Navy, Really Rust, Garden Green & Whisper White Cardstock.
* Night of Navy, Really Rust and Garden Green Stamp Pads.
* Window Word Punch & Tearing Edge.

Tuesday, February 24, 2009

Happy Birthday My Little Man

Yesterday my eldest son celebrated his 7th Birthday. Although I made a card for him, I don't think he even looked at it once he opened his present to reveal what he'd "always wanted"...a blue Ipod which we had to charge and download music to ASAP.

I really liked the brightness of the card and the simple geometric design which I obtained from the demonstrators Web Site of Stampin' Up! Also, being so simple, I thought it would be quick and easy for everyone to play along with if they wished. So, below is this week's layout challenge:


Here is my example:


Supplies:
* Birthday Whimsy (SAB 08 Set) & Wild About You Stamp Sets.
* Real Red, Whisper White, Brocade Blue Cardstock.
* Certainly Celery & Brocade Blue Stamp Pads.
* SAMJ, Certainly Celery 1/4" Grosgrain Ribbon and Bold Brights Brads.

Moving on to last weeks layout challenge, I hope you all had fun with that one! There were some lovely cards designed with this layout that I'd now like to show you. As always, if you'd like more info on the card or the artist, simply click on the photo and a hyperlink will take you through to the artists blog. These blogs are DEFINITELY worth checking out as the ladies are extremely talented!

Marcia:


Leah:

If I've missed any one's cards, please let me know ASAP so I can add you to this post. For those wishing to have their cards showcased next week for this weeks layout, please leave a post in the comments for this post as well so I can find your entries easily. Thanks.

Monday, February 23, 2009

An Embossed Birthday Wish

Hello readers,

I'm back again after a few days of chaos at my home. It began with blogger playing up on me on Thursday, and a BBQ to get ready for on Friday preventing me from updating my blog. Then, over the weekend, DH has managed to come down with some illness - and we all know how pathetic men are when they get sick. If that wasn't enough, to top things all off, my washing machine also decided to completely die...and it didn't do it quietly or have the decency to finish the load that was washing either!

However, after all of this, I have a weeks work of posts ready to show you. I'm going to be creating all the posts tonight and setting them to automatically publish so, if you'd like your take on last Tuesday's layout challenge card showcased on my blog, please email me a picture or post a link before 7pm CST so I can add it to the post.

Now to today's post. On the weekend I demonstrated a workshop where the hostess asked to be shown heat embossing. I love heat embossing and designed two cards showing different embossing techniques. All the girls loved their creations, and this was my example of the first card we did. I've kept it very simple as many of the ladies attending had never heat embossed and I didn't want to frighten them off...LOL!

Supplies:
* Baroque Motifs & Sincere Salutations Stamp Sets.
* Whisper White & Taken with Teal Cardstock.
* Encore Gold and Taken With Teal Stamp Pads.
* White 1/4" Grosgrain Ribbon, Gold Embossing Powder & Mat Pack with Piercing Tool.

Tuesday, February 3, 2009

Make a Wish

Hello everyone. Well, it's Tuesday so it's time for another layout challenge and of course, to show you what some talented ladies created with last weeks design. I'm afraid I don't think I'm going to make too many friends this week with the layout challenge, just remember it is supposed to be a challenge and please, try not to be too angry with me. Here it is:

My inspiration for this card came from a similar one in the new US Stampin' Up! catalogue. The card I created however, is a little different in that I've added stitching to my design, changed the colours, used DSP and carried the pattern all the way across the card. Although I've used circles, for this layout, you can use ANY shape you wish. If your really adventurous, why not try using buttons, pretties or even rectangles of different sizes if you don't have any punches. Just remember to have fun!

Now, here's my example:

Supplies:
* So Many Sayings Stamp Set.
* Pumpkin Pie & Whisper White Cardstock. Summer Picnic DSP (Spring Mini).
* Pumpkin Pie Stamp Pad.
* Linen Thread, 1/3/8", 1/1/4" & 1" Circle Punches.

Now to what you've all been waiting for. Here are the layouts that some of you have made during the past week (the ones I know about anyway). Once again, to view more work or gain information from the artist, if they have a blog, a hyperlink will carry you through to that site if you click on the picture of their creation.

Sharon:

Tammy:

Kellie:

Tuesday, January 27, 2009

Dragon Wishes

It's Tuesday which means, another layout challenge for you all. I've popped together something a bit different for today, and I hope you like this weeks challenge. So, here's the layout:

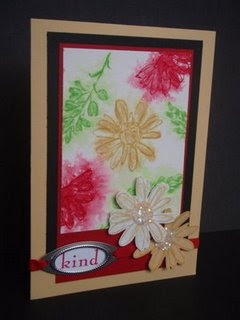
And below is my example. Not only is it an example of this weeks layout challenge, but it's also the perfect example of why I should NOT be allowed to use bold brights and why, I'm still very much afraid of using colours outside monochromatic tones. I am very sorry for this card, but I just couldn't get it right and I ran out of time to re-do it for the fifth time.

I've used my cuttlebug embossing folder for the 'dragon scale' look. I've also tried to draw little dragon footprints around the edge of the card. The image has been water coloured with watercolour wonder crayons...my favourite colouring medium to use.

Supplies:
* Stamp It Dragon Birthday Stamp, Bold Birthday Stamp Set.
* StazOn Black Lovely Lilac & Gable Green Stamp Pads.
* Pixie Pink, Whisper White, Lovely Lilac, Gable Green & Water Colour Cardstock.
* Water Colour Wonder Crayons, Aqua Painter & Markers.

As always, I'd like to show you the creations made by my readers during the previous week. They are fantastic and I'd like to thank you all for once again playing along. For those requiring more information on the cards, if you click on each card picture a hyperlink will move you across to the artists blog if they have one. Of course, the cards below are the cards I know about, so if I've missed you in this post, please make sure you leave a comment so we can find your creation.

Chook:


Natasha:


Karen R:

Well, I've got to run and finish covering school books for back to school on Thursday. Until tomorrow Adieu!

Tuesday, January 6, 2009

Whimsical Birthday

Ha ha! Well, my first weekly layout challenge for 2009 is here and I managed to not only come up with a layout, but also make a card to show you all too! So with no further adieu, here is this weeks layout challenge:

And here is my example:

I've decided to post weekly layout challenges for two reasons. The first reason is that many of my readers requested I do this. The second reason was to encourage you all to get out your own stamping supplies to create your own projects and challenge yourselves.

Feel free to email me your creations to post, or pop a link in the comments to your own blog showing your creation for us all to look at. There will be no weekly prize and no weekly winner for this challenge as I hope to encourage participation & FUN rather than competition. I hope you like this idea. Today's creation which was inspired by Teneale Williams.

Supplies
* Garden Whimsy, Polka Dot & Cheery Chat Stamp Sets.
* Certainly Celery, So Saffron, Groovy Guava and Whisper White Cardstock.
* So Saffron, Certainly Celery & Groovy Guava Stamp Pads.
* Groovy Guava Double Stitched Ribbon & Stampin Dimensionals.

Tuesday, November 18, 2008

Whoopsey:

I LOVE one layer cards...particularly when there on whisper white cardstock. On the weekend, while demonstrating a one layer birthday card I made a basic stamping error - just to show the ladies what happens when you don't apply even pressure to your stamp...of course!

Well, not wanting to waste the cardstock even though I now couldn't use it as a one layer card, I decided to mount it on cardstock tonight. I've kept everything very simple and bright adding the brads for just a touch more colour.

Supplies:
* Birthday Best & It's your Birthday Stamp Sets.
* Basic Black Stamp Pad. Creamy Caramel, Lavender Lace, Certainly Celery, Apricot Appeal & Pretty in Pink Stampin' Write Markers.
* Whisper White, Apricot Appeal & Certainly Celery Cardstock.
* Soft Subtles Brads, SAMJ & Stampin' Dimensionals.

Tomorrow, make sure you check my blog as I'm going to begin my 12 day's of Christmas Cards/Posts which was an idea I saw on Marelle Taylor's Blog and fell in love with it.

Thursday, November 13, 2008

Butterfly Birthday Wishes:

Today I thought I'd show you this card that was inspired by a magazine add for Wendy Irving Stamps. It's a really simple card to make, and is great for beginners to practice centering their images when using punches. Around the edge of the top and bottom piece of Whisper White, I've faux stitched to 'blend' the card together.

Supplies:
* Cause for Celebration Stamp Set (Level 2 Hostess set).
* Whisper White & Perfect Plum Cardstock.
* Pretty in Pink, Perfect Plum & Certainly Celery Stamp Pad.
* Perfect Plum Marker & SAMJ. 1/3/8" Square Punch.

Thursday, October 9, 2008

Birthday Girl:

October is definitely a fantastic month for card makers. Not only does it incorporate World Card Making Day, but it's also Stampin' Up's! 20th Birthday. To celebrate, Stampin' Up! are offering a 20% discount on selected stamp sets with any $20 catty purchase (see details HERE).

Tonight's card was made using the Big Bold Birthday set which is one of the stamp sets on sale. I LOVE this set and use it as often as I can when making birthday cards. It's quite versatile and can also be used for Christmas, congratulations and new years cards just to name a few. The cup cake icing stamp is also great for using as clouds as well. I'm really happy with how this card turned out, and if memory serves, I think it's the first time I've used blush blossom cardstock. I can easily see it becoming a favourite.

Supplies:
* Big Bold Birthday Stamp Set.
* Blush Blossom, Close to Cocoa & Whisper White Cardstock.
* Blush Blossom & Close to Cocoa Stamp Pads.
* Slit Punch, Crop-a-dile, Whisper White Grosgrain Ribbon & Stampin' Dimensionals.
* I was lazy and simply used kindy glitz for the glitter effect.

Wednesday, October 1, 2008

Happy 20th Stampin' Up!

I finally made time to play with a SCS challenge, and it was to make a birthday card that's easily demonstratable and incorporates silver for SU's 20th Anniversary. I know I use this layout quite often, but it's so easy and looks great.

With this card, I've watercoloured the cupcake, added the silver brads, mounted the main image on metallic silver cardstock and heat embossed in silver the spotted background. For this card, I also managed to use the Bashful Blue Striped Grosgrain Ribbon which I've had in my stash for a while now but hadn't used.

Supplies:
* Bashful Blue, Metallic and Watercolour Cardstock.
* Cause For Celebration & Polka Dot Stamp Sets.
* VersaMark & StazOn Black.
* Watercolour Wonder Crayons, Aqua Painter, Bashful Blue Striped Grosgrain Ribbon, Silver Brads, Silver EP, Heat Gun & Embossing Buddy.

Monday, September 22, 2008

Happy Birthday ATC:

A few weeks ago I participated in an ATC (Artist Trading Card) swap with 13 other SU demonstrators. All the ladies should have their swaps by now, so I'm fairly confident that I can now post the above. The rules included heat embossing and using 1 metallic piece of cardstock. The above is what I've created, and I really hope that the girls liked what I made. Although it's a little hard to see, each cup cake is raised from the surface of the card with stampin' dimensionals.

Supplies:
* Big Bold Birthday & Birthday Best Stamp Sets.
* Purely Pomegranate, Close to Cocoa, Pretty in Pink & Encore Cold Stamp Pads.
* Purely Pomegranate, Gold & Whisper White Cardstock.
* Stampin' Dimensionals & Gold Embossing Powder. Heat Tool.

Saturday, September 13, 2008

SUPER-Stampers Virtual Stampin' Night
Project 3:


The last project of tonight is going to be a layout challenge. You can use anything you like to make your card, but please use the layout supplied (you can manipulate slightly but we must be able to see the main layout features). Remember, you have an hour, Good luck and have fun.


The Layout:


My Example:

With my example, I've used the corner rounder to scallop the bottom edge of the back sheet and have then used the crop-a-dile in an effort to try to make a 'lace' effect. I've also faux dry embossed the main image, and have only coloured in some of the flowers on the dress for a more subtle effect. The inspiration for this card has come from a lady by the name of Emily Giovanni. Her blog is DEFINATELY worth a look.

Supplies:
* Bloomin' with Happiness (retired Level 1 Hostess Set)
* River Rock, Soft Skies & Very Vanilla Cardstock.
* Basic Black, Soft Skies & River Rock Stamp Pad.
* Corner Rounder, Soft Skies Double Stitched Ribbon, Crop-a-dile & Sponge.

Monday, August 18, 2008

Mel's Friday Challenge:

Each fortnight my sister demo Mel places a colour challenge on her blog. Last week it was based on the below picture and we were to use Garden Green, Chocolate Chip, Pretty in Pink and Apricot Appeal. I have to say, these colours together look much nicer in nature. Anyhow, moving on, the card I created I'm not overly happy with, but this was the best of three attempts.

Here is the inspiration


And here is my creation

Supplies:
* Boho Backgrounds, Blossoms Abound & Lots of Thoughts (retired) Stamp Sets.
* Whisper White, Garden Green & Chocolate Chip Cardstock.
* Garden Green, Chocolate Chip, Apricot Appeal & Pretty in Pink Stamp Pads.
* 1/4" Chocolate Chip Grosgrain Ribbon, Gold Cord (retired), Sponge, Vintage Brads, Crop'a'dile and SAMJ.

Sunday, July 20, 2008

For the Katherine Show:
As everyone knows, I've been very busy lately preparing entries into the Katherine Show. Well, now that I have them back, I thought I'd share my creations with you.
1. Covered Book.

Here I've covered an address book I bought from the local dollar shop. This covering was inspired by a card made by a lady called Angela R, which I absolutely fell in love with. Feel free to scroll through her fantastic blog which can be found HERE. Angela's blog is an inspiration in itself, and I love visiting when I'm having an off day!

2. Birthday Card.

Ok, I admit it, I entered a Criss-Cross card for something different. I thought I'd use up some of my retired cardstock and papers, and was surprised at how well this ribbon went with it. I love the effect the rose gives to hide the ribbon seam, although it was quite time consuming to cut out with my papersnips! Although you can't see by the photo, the actual rose is lifted slightly off the page with stampin' dimensionals.

3. Greeting Card.

This card was my first (successful) gel card, and because I was overjoyed, and relieved at the end result, I decided to enter it into the show in the 'general' greeting card section. I had a lot of fun making this one, and although it's difficult to see, I've used kindy glitz and dazzling diamonds just about anywhere I can on the actual image. I would have loved to have added a hatpin with diamantes and pearls shaped as a fish hook through the knotted ribbon, but bending those things, takes much more strength than I had late Tuesday night.

4. Christmas Card.

The last card I made for the Katherine Show was this Christmas Card, which looks a lot better in real life. This card was so easy to make, and took about 30 minutes, but I just love how effective it is with the acetate window stamped with white StazOn and highlighted with Kindy Glitz. I hope you like it too.

Monday, July 7, 2008

Cause For Celebration

I hope your all having fun creating basic cards for my basic card challenge. I've heard through the grape-vine that there's quite a bit of excitement with regards to idea's etc which is fantastic!

Tonight I had to make a birthday card RAK (Random Act of Kindness) for a lady in the US. I decided to make two - one for her and one for me to keep up my sleeve. The first card I made, I kept to very simple techniques of watercolouring and using Designer Series Paper. I also matted my main stamped image. The entire card was made in about 20 minutes and is very easy to re-create for those at home with limited supplies.

Basic - Cause For Celebration:


Supplies:
* Itty Bitty Backgrounds & Cause For Celebration Stamp Sets.
* Perfect Plum & Pretty in Pink Cardstock. Watercolour Paper & Slumber Party DSP (retired)
* StazOn Black Ink. Perfect Plum Ink.
* Watercolour Wonder Crayons & Aqua Painter.
* SNAIL.

I then decided I wanted to show how easy it is to take the next step by adding a few accessories and 'vamping' it up a little. It's amazing how easy it is to take a simple base and take it to that next step easily and quickly. Here's where I've used a little extra for that little extra.

In hindsight, I would have also liked to have added Dazzling Diamonds to the candle flame, but I'm afraid I couldn't find my two way glue pen, and getting out the heat and stick powder was to much of a big job for a little bit of bling.

So, what have I done differently??? Well, I've used textured cardstock. Stampin' Dimensionals have also been used to layer the main image, and I've double matted the DSP to 'frame' the vertical lines. I've also used brads in the corners of the image to finish off the picture. To get the brads perfectly positioned, I've also used the mat pack. That's it! Now it's time for you all to step beyond the basics by perhaps adding 1 embellishment such as a brad or dazzling diamonds.

Supplies:
* Itty Bitty Backgrounds, Cause for Celebration.
* Perfect Plum 12x12 textured cardstock. Pretty in Pink & Perfect Plum Cardstock. Watercolour Paper, Slumber Party DSP (retired).
*StazOn Black & Perfect Plum Stamp Pads
*Watercolour Wonder Crayons & Aqua Painter.
* Stampin' Dimensionals, SNAIL & Soft Subtles Brads.

Friday, June 27, 2008

Basic Backgrounds & Cut-Outs:


Today I wanted to show you, that it's easy to create great looks by using Designer Series Papers, and by simply cutting out your stamped image as I've done above. This card was easy and quick to make, as the entire background has been covered with DSP cut to size. I've then banded the middle of the card to break up the background a little and added some ribbon to break up the band.

I hope you like this card. To date, I've found 'In the Spotlight' difficult to use, but this card definitely turned out much better than I expected it would, and I am happy with the result. It actually reminds me a little of the NT, with the blues of the sky, greens of the palms and the red of our soil.

Supplies:
* In the Spotlight Stamp Set.
* Really Rust and Whisper White Cardstock. Fall Flowers Designer Series Paper 12x12.
* Really Rust Stamp Pad.
* Whisper White Grosgrain Ribbon & Vintage brad. I've also pierced the band using the Mat Pack.

Monday, June 23, 2008

Back to Basics:

Here's a card I semi-cased from the 06/07 Stampin' Up Idea's Book and Catalogue. 2007 was the year I was first introduced to Stampin' Up, when a friend of mine from Sydney sent me a catalogue as she'd just had a party. At the time, I fell in love with the fantastic creations on those pages, but it was almost a year later when I finally made it to a workshop in the NT.

Flicking through the pages tonight reminded me of how overwhelmed I was by the fact that someone had made those projects, and 'apparently' it was just as easy for me to do too! In saying this though, I didn't know where to start, and even though I had the basics...I didn't know how to use them.

So, this week, I've decided to return to the basics and to share a couple of easy things to incorporate in your own card-making when your beginning - so your project starting points don't seem so daunting. Tonight, I thought I'd share what I call the "Stamped Strip" technique, which is simply stamping onto a strip of cardstock, matting it onto a co-ordinating colour and then adhering it to the card front which is in another colour again. In the above card, I've also added some grosgrain ribbon, brads and the cheapest of all embellishments...piercing.

Supplies:
* Petal Prints & It's Your Birthday Stamp Sets.
* Bashful Blue, Whisper White Cardstock. Certainly Celery Textured Cardstock.
* Certainly Celery, Pretty in Pink, Bashful Blue and Whisper White Stamp Pads.
* Certainly Celery Grosgrain Ribbon, Silver Brads, Mat Pack and Paper Piercer.

Monday, June 2, 2008

Kathryn M's Birthday Card Entry:


This birthday card is from Kathryn, and uses the level 1 hostess set From the Garden to full advantage. It's hard to believe that Kathryn's only been stamping for a little over a month now, but judging from her blog, I think I can safely say she is a very gifted stamper. Thank you Kathryn for your entry. Even though we've never met, I'm so glad you took the time to enter my competition.

Supplies:
* From the Garden (Level 1 Hostess Set) and Baroque Motifs Stamp Sets.
* Soft Sky and Blue Bayou Stamp Pads.
* Soft Sky, Blue Bayou and Whisper White Cardstock.
* Scallop Punch, Blue Rhinestone Brad and the Soft Sky Double Stitched Ribbon.

Sunday, June 1, 2008

Tammy B's Entry:

This entry to my feminine birthday card competition is from Tammy, who hand delivered it to me a few days ago. It's very pretty and very feminine using both SU and CM product together very harmoniously. Thank you Tammy, your card was lovely. The first picture shows the front of the card, while the second shows stage 1 of the opening of the card with a personal message within the pink folds of cardstock.

Supplies:

* Petal Prints & It's Your Birthday Stamp Sets.

* Certainly Celery, Pretty in Pink, Chocolate Chip Cardstock.

* VersaMark & Chocolate Chip Stamp Pads.

* Slit Punch. Miscellaneous Organza and Satin Ribbon and CM Blush Blooms Paper.